Showing posts with label disc. Show all posts

How to Replace Rear Disc Brakes in a Ford Mustang

Replacing the rear disc brakes on a Ford Mustang requires a special tool, Rear Caliper Piston Adjuster 206-026, to seat the piston. Purchase this tool at your Ford dealership in the parts department. With this special tool and these instructions, you are ready to replace the rear disc brakes in your Mustang.

Instructions

    1

    Siphon half of the brake fluid from the master cylinder reservoir and put it in an approved container. Take the brake fluid to your local auto parts store for proper disposal.

    2

    Raise the vehicle off the ground using a car jack. Loosen the lug nuts with a torque wrench and remove the wheels.

    3

    Disconnect the rear disc brake caliper and hang it from the body of the Mustang with wire. Take out the inner and outer rear disc brake pads along with the spring clips.
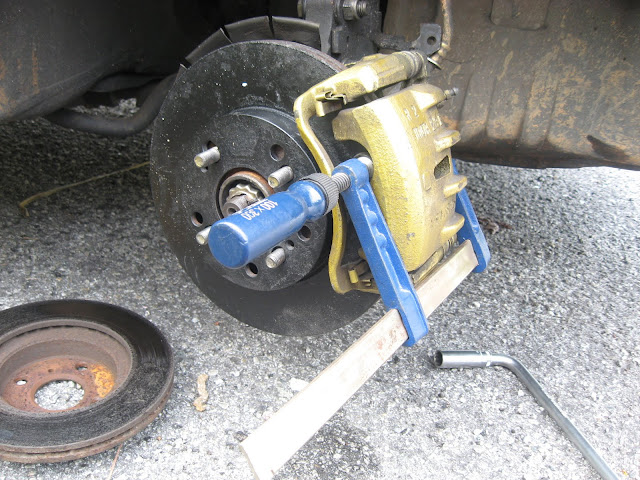
    4

    Seat the piston by rotating it clockwise using the Rear Caliper Piston Adjuster 206-026. Replace the disc brake pads and spring clips with the new ones.

    5

    Line up the notch in the caliper piston with the alignment pin on the brake pad. Mount the rear disc brake caliper and use the torque wrench to tighten it to 24 ft. lb.

    6

    Replace the wheels and lower the Mustang to the ground. Position the new rear disc brake pads by pumping the brake pedal rapidly. Refill the master cylinder reservoir with clean brake fluid.

Read More..

How to Replace Rear Disc Brakes in a Mazda6

The Mazda6 is one of several vehicles manufactured with disc brakes only. This is due to the efficient stopping power disc brakes have compared to drum brakes. The Mazda6 requires a special tool referred to as 49 FA18 602, which is available for purchase at the Mazda dealership.

Instructions

    1

    Loosen the lug nuts of the cars rear wheels using a torque wrench, but dont fully remove the wheels.

    2

    Raise the vehicle off the ground using a car jack. Support the vehicle on all sides. Remove the lug nuts completely and take off the rear wheels.

    3

    Remove the parking cable clip. Take out the upper caliper bolt and turn the caliper so that it faces down.

    4

    Take off the V-springs and rear disc brake pads. Separate the shims from the brake pads.

    5

    Push the rear caliper pistons into the bores of the Mazda6. This requires the use of tool 49 FA18 602.

    6

    Install the V-springs. Connect the new shims to the new brake pads. Install in the vehicle.

    7

    Torque the caliper bolt using a torque wrench. For the basic Mazda 6 models, torque it 27 to 36 foot pounds. For the Mazda Speed 6 models, torque it 16 to 23 foot pounds. Replace the wheels.

Read More..

AE111 twin pot replacing front disc and brake pad

In this thread I will show how I modified 5 hole disc to 4 hole and fit it into my AE111. Since my brother left his DC5 disc at my house, I will use his disc to fit into my car. This is tool that I use beside of the hand drill
Here is picture of original disc
Disc marked before drill
And here is 4 hole already drilled
To fit the disc into my car, firstly took out tyre and rim then took out caliper. Here is the picture in the process. Before started
By using this type of clamp, I push the brake pad further away so that easier when to install new disc
Remove this 2 screws that hold caliper
Then I hang the caliper to avoid caliper hanging only with brake hose
Test to fit modified disc rotor
Cheap brake pad that I used
New brake pad install
Then install back caliper into knuckle
Comparison before and after
Put wheel and ready to go. p/s:before that make sure continuously pump brake until feel brake pad grip before start driving
Read More..

How to Replace Rear Disc Brakes in a Hyundai Sonata

The Hyundai Sonata has one of two types of brakes in the rear of the car; the brakes are either disc or drum brakes. While they both offer efficient stopping power, rear disc brakes are easier to replace. Follow these steps to learn how.

Instructions

    1

    Raise the rear of the vehicle off the ground using a car jack. Support the vehicle on all sides with jack stands to prevent it from tipping.

    2

    Remove the rear wheels from the Sonata. Loosen the lug nuts with a torque wrench and slide off the wheels. Set them on the ground, face up, to prevent damage.

    3

    Disconnect the lower caliper mounting bolt. Rotate the caliper upwards and fasten it to the frame with mechanical wire.

    4

    Take out the pads from the caliper support. Remove the pad retainers as well if they require replacement.

    5

    Install the new pad retainers if they required replacement. Slide the new brake pads onto the pad retainers.

    6

    Compress the piston with a C-clamp. Remove the caliper from the mechanics wire and rotate it downwards onto the brake pads. Replace the mounting bolt and torque it between 16 to 24 ft. lb. Remove the C-clamp.

    7

    Replace the wheel assemblies on the Sonata and lower it to the ground. Pump the brake pedal in a slow but firm manner to seat the brake pads.

Read More..