There are no new Ford Falcons rolling off the assembly line, so if youre a fan of this make, youve got to treat yours with the utmost care. An important part of maintenance involves checking the brake rotors periodically for pitting or cracking. When the rotors start looking worse for wear, its time for replacement. Fortunately, this is a relatively fast and easy process that requires only the most basic tools.
Instructions
1
Park your Falcon on a level surface and put it in park, but do not apply the parking brake. Make sure the steering column is not locked.
2
Slide wheel chocks behind each of the two front tires.
3
Slide a floor jack under the rear end of the car, directly beneath a solid part of the frame. Pump the jack handle until the rear end of the car is up high enough for you to be able to put two jack stands underneath.
4
Put a jack stand under each side of the rear end of the car, making sure theyre positioned beneath solid sections of the frame. When the stands are in place, gently release the pressure on the jack until the car comes to rest on the stands. Pull the jack out from under the car.
5
Use a tire iron to remove all of the lug nuts from each of the two rear wheels, then pull the wheels off and set them aside.
6
Locate the two large bolts on the back side of each rear brake caliper. Use a socket wrench to remove these bolts, but do not pull the calipers off of the caliper mounts immediately.
7
Get some twine, wire, twist ties or some other binding material. One at a time, lift each caliper off of the caliper mount and temporarily attach it to an exposed part of the undercarriage using your binding material. This is just to make sure that the caliper does not dangle by the brake line, which can cause brake line damage and subsequent failure.
8
Pull both brake pads out of each of the two rear caliper mounts.
9
Use a socket wrench to remove the two bolts holding each of the rear caliper mounts to the rear rotors. Set these bolts and the caliper mounts aside.
10
Pull both of the old rotors off of the wheel spindles.
11
Slide the new rotors onto the rear wheel spindles.
12
Reattach the brake caliper mounts to the new rotors using the original bolts. Install them in the same approximate location where they were installed on the old rotors.
13
Slide the brake pads back into the slots on both rear caliper mounts. If youre switching to new pads at this time, use the new ones instead.
14
Untie each dangling caliper one at a time and place it over the caliper mount, then install and tighten the two bolts on the back side.
15
Reinstall both rear wheels by sliding them onto the wheel spindles and tightening down all of the original lug nuts with a tire iron.
16
Slide the floor jack back under a solid part of the rear frame and jack it up to about one inch above the jack stands. Reach under the car to pull out the jack stands, then carefully lower the Falcon all the way to the ground.
17
Move the wheel chocks to the rear tires and repeat this entire process on the front end of the car.
Summary:www.know-car.com auto repair videos When changing brake pads on a car, make sure the car is jacked up, remove the bolts on the caliper and remove the brake pads. Replace brake pads in a car with help from an auto mechanic in this free video on car maintenance and repairs.
In this thread I will show how I modified 5 hole disc to 4 hole and fit it into my AE111. Since my brother left his DC5 disc at my house, I will use his disc to fit into my car. This is tool that I use beside of the hand drill
Here is picture of original disc
Disc marked before drill
And here is 4 hole already drilled
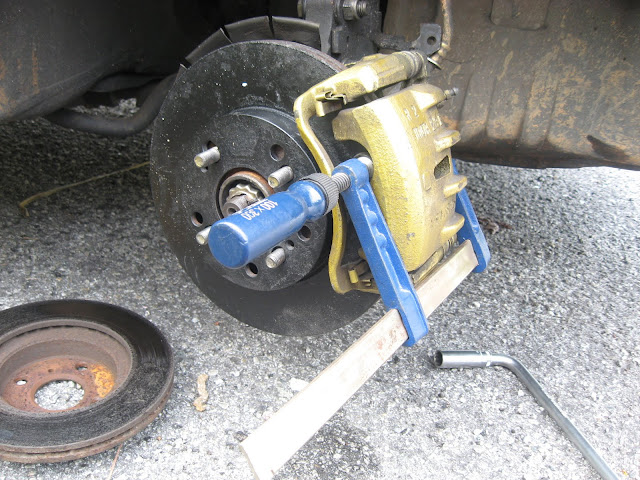
To fit the disc into my car, firstly took out tyre and rim then took out caliper. Here is the picture in the process. Before started
By using this type of clamp, I push the brake pad further away so that easier when to install new disc
Remove this 2 screws that hold caliper
Then I hang the caliper to avoid caliper hanging only with brake hose
Test to fit modified disc rotor
Cheap brake pad that I used
New brake pad install
Then install back caliper into knuckle
Comparison before and after
Put wheel and ready to go. p/s:before that make sure continuously pump brake until feel brake pad grip before start driving
If you drive your Jeep Grand Cherokee through tough, off-road conditions, consider reinforcing parts like the brake lines. Changing the line sections directly connected to the brake hoses with stainless steel pipes increase their durability.
Instructions
Preparation
1
Look under the hood and locate the Grand Cherokees master cylinder reservoir on the drivers side. Top off the brake fluid and seal the cap tightly to reduce the amount of fluid lost during the replacement process.
2
Lift the vehicle and support it on jack stands. Remove the wheel to reach the brake line and caliper.
3
Take a look at the existing brake line and bend the replacement line accordingly to reduce strain while driving.
Replacement
4
Remove the brake line at the brake hose first. Undo the two bolts on each connector using two line wrenches.
5
Attach the new brake line, starting at the end farthest from the brake hose to avoid stretching the hose. Tighten the bolts with the wrenches after applying them by hand.
6
Bleed the system of air. Open the caliper bleeder valve, attach a vinyl tube and place the end in a container with some brake fluid. Have an assistant press the brake pedal to remove the air.
7
Put the wheel back on and repeat the process on the next wheel. Test the brakes once youve replaced all four lines.
If you need some help with replacing your motorcycle brake pads, the experts at Galfer Performance Braking Systems located in Oxnard, CA are here to help! Learn the correct approach to take when replacing your pads to avoid the common mistakes that can lead to brake issues down the road.
The anti-lock braking system on the 1990 Honda Accord uses three main components, in conjunction, to work effectively. The brake pads and calipers are responsible for squeezing against the brake rotor when the brake pedal is depressed. A rotor that is severely scored or warped will not perform as the driver expects. While it is possible to have scratched rotors resurfaced, any deep gouging of the rotor surface or warping will require immediate replacement.
Instructions
1
Jack up the Honda and support the vehicle on jack stands.
2
Remove the lug nuts with the lug wrench and pull the wheel of the corresponding rotor(s) to be replaced from the wheel bolts.
3
Remove the caliper bolts with a 13-mm wrench and pull the caliper from its mount around the rotor. Place the caliper on top of the steering arm or on an idle jack stand to prevent the weight of the caliper from damaging the attached brake line.
4
Remove the two screws on the top hat surface of the rotor with a Phillips-head screwdriver. The top hat section of the rotor is the raised center surface on the outside of the rotor.
5
Pull the rotor straight from the wheel bolts (outward). Spray the rotor with chain lubricant if it is stuck to the wheel bolts or steering knuckle (the component directly behind the rotor when installed).
6
Spray the new rotor with brake cleaner and wipe excess cleaner packing oil from the rotor with a towel.
7
Place the new rotor onto the wheel bolts, with the top hat section facing outward. Replace the two screws on the outer surface with the Phillips-head screwdriver.
8
Return the caliper onto the rotor and replace the caliper bolts with the wrench.
9
Place the wheels onto the wheel bolts and screw on the lug nuts. Remove the jack stands from beneath the Honda and lower the vehicle to the ground. Tighten the lug nuts with the lug wrench.
The brake system on your Ford Mustang requires periodic inspection and maintenance. Unfortunately, it is not until we notice strange smells, noises or mechanical changes coming from a brake component that we start to pay attention to the system. For the most part, lack of maintenance is the main cause of most brake system troubles, which makes diagnosing and solving the problem much easier. However, neglect the symptoms, and you are asking for serious trouble on the road.
Checking the Hydraulic System
First, check for the most obvious cause of brake problems. Make sure the brake fluid level on the brake master cylinder is correct. The master cylinder is located inside the engine compartment, in front of the steering wheel and mounted on a cylindrical unit called the brake booster. Add the brake fluid recommended on your car owners manual, if necessary.
Check the brake booster and the vacuum hose attached to it for signs of wear or damage. Problems on the booster housing or hose may cause vacuum to leak, and leave your brakes extremely difficult to operate.
Then check for possible leaks around the master cylinder and the brake lines that connect to it. Make sure the connections are tight. James E. Duffy, on Modern Automotive Technology, recommends running your fingers along the lines to check for hard to detect leaks. Inspect the brake hoses that join the lines to the brake assemblies on each wheel. Remove the tires, and use a flashlight to look for wet spots around the hoses and the back of the wheel assemblies. If necessary, replace the brake hoses.
Inspecting Wheel Brake Assemblies
Once you remove the tires, check the brake pads, shoes, rotors and drums for wear, damage and wet spots that might indicate fluid leaks or grease contamination. As a rule of thumb, the linings on the pads and shoes should be thicker than the back plate on which they are mounted. Closely examine the rotors and drum braking surfaces for heat checks, scores and cracks. If necessary, take your rotors and drums to the auto repair shop for resurfacing.
When removing the drums on the back wheels, inspect the wheel cylinder. This is a small cylinder mounted on the upper section of the back plate. Pull back the rubber boots on each side of the cylinder to check for brake fluid leaks. A leaking cylinder can be rebuilt or replaced. Inspect the drum brake mechanism like springs; hold down the springs and adjuster star wheel to check for missing or binding parts.
If your Ford Mustang model is equipped with an anti-lock brake system (ABS), and the system light flashes on your dashboard as you drive, your vehicle computer has detected a malfunction. You can use a scan tool to retrieve any trouble codes stored in the computer memory to diagnose the malfunction, or have the auto shop look at the problem.
For help locating brake system components or required maintenance intervals for your specific Mustang model, you may consult your car owners or vehicle service manual. Most auto parts stores carry service manuals, and your local public library might have several of these manuals for reference.
-Wheelbrace (Should be included in your cars repair kit though investing in a Metal cross would be worthwhile).
-Fresh brakePads EUR30+
-Hydraulic Jack (you will need a proper main jack in conjunction with some axle stands
Basic Car Maintainence II; Brake Pad Change
Pad removal checklist
-Procedure -Check?
Loosen wheel nuts
Jack car up
Remove wheel
Examine braking system
Remove Caliper, Slide away from wheel
Open caliper pins, release brakepads
Check Brake disc for damage
Prior Preparation:
-Always park your car in a suitable area with adequate workspace when attempting a brakepad change. Secure the Handbrake and disengage gear to neutral, prior to jacking the car up.
-Now block the cars rear wheels so it wont roll once you jack it up onto the axle stands!
-Spread your tools out and select a wheelbrace, moving to one of the front wheels. The wheelbrace is a metal bar with a socket on the end for removing wheelnuts. It will usually come with your cars toolkit, however if you dont have one, a socket set purchase will be necessary!
-Its always a good idea before jacking the car up, to loosen the wheel nuts first, whilst the car still rests on the ground. Usually the nuts will be tight, so trying to loosen them whilst the wheel is in the air will create some problems, (i.e. the wheel will keep spinning around!). Grab your wheel brace and proceed to loosen the nuts, however dont take them off fully, loosen them just enough until they can later be removed by hand.
-Jack the car up in a suitable, supported area of the cars chassis. Recommended areas to jack the car up will be detailed in your cars, owners manual. Make sure you use the chassis as a jack point for trying to lift the car! Never work on a car which has been elevated by only a hydraulic jack. Place both axle stands under each end of the main front axle, lowering the car onto the stands
Removing old brakes:
-Now that the car is supported firmly on the stands, you can progress to remove the wheel! The already loosened wheel nuts can be removed by hand, and when taken off make sure to place them in a cardboard box or in a drawer so you can find them at a later stage!
-Remove the wheel slowly and place it under the cars door nearest the wheel you are working on. You can never be careful enough when working on a suspended car, in addition to the axle stands and jack you are using, its always a good idea to have that wheel there, in case a faulty axle stand, broken jack etc lets you down and could result in the car falling! Taking these small yet extremely relevant safety steps are extremely necessary.
-Now that you have removed the wheel entirely, a brake system assembly should be visible before you.(or if not your in trouble!). The braking system consists of a brake caliper, two brakepads and a brake disc.
-As the diagram illustrates, the brake caliper is attached to the brake disc. Inside the caliper are two brakepads which need changing. When you press the brake lever in your car, the caliper will squeeze the brakepads onto the brake disc, in turn slowing them down, and effectively then the wheel. Imagine a CD spinning around, where a hand then from either side clamps onto it slowly, that has the same principle as the braking system.
-There will be bolts which fix the caliper in place and prevent movement. Remove these bolts (spanner size requirements will vary on different cars, investing in a socket set is again advised!) and take the caliper away from the brake disc. You should now have the brakepads within vision through the caliper.
-Examine the caliper closely. On different cars, brakepads will be held in by contrasting methods. Clip pins usually fix the pad into place, so when you remove these pins the pad will be released and can then be removed. Follow this procedure and remove the old pads. While you are examining the brakepads, glance over the brake disc also, if it has any grooves or chips in it, it will need replacing.
Replacing with new pads:
-Now that you have removed the old brakepads and are ready to replace with new pads, firstly check you have bought the correct size and model! Compare the new with the old, and once satisfied progress to place the new pads into the brake caliper, and make sure they are put in the right way!!
o Pull quote for pic: "Brakepad wear will be significantly increased on the right-hand side front wheel, due to added weight of the driver under braking."
-In putting in new pads, you will have to push the caliper piston back in, in order to fit the new pads in. The piston is usually a round face which pushes the brakepads in when the brake lever is pressed by a cars driver. When you would have earlier took the pads out, the piston will have opened out. This can be slightly tricky, so try pushing it back in with the heel of your hand firstly. If that doesnt work you can try an flathead screw-driver to gently prise the piston down and back into original position.
-Repeat the above procedure, though in opposite motion. Ensure that the piston is back in place, fit the new pads and put the clips back on which hold them in place! Remount the caliper back on to the brake disc. When this has been completed check around the caliper and bolts to ensure everything has been completed successfully.
-Find your wheel nuts which earlier where placed in a box, and place the wheel back on. When lined correctly, place the wheel nuts on, only by hand. Remove the axle stands and release the Jack slowly until the car rests on the ground. Grab your wheel brace and tighten the wheel nuts. Hey Presto, you have a brakepad change, but wait, theres the other front wheel! Repeat the procedure on the other wheel.
When you have completely finished both wheels, before you go driving make sure to pump your brake lever inside the car or you will have no brakes! Press the brake lever up and down, this will force hydraulic oil back into the braking system, which will push your
Pad Replacement checklist
-Procedure -Check?
Push Caliper piston back in
Place pads back in and lock with pins
Remount caliper to brake disc
Check everything over
Remount wheel
Put wheel nuts back on
Pump Brake lever prior to driving!
Basic Car Maintainence II; Brake Pad Change Lincoln Navigator For Sale 00.00, Headers, Flowmaster Super 40 Exhaust Sound Video Clips. Duration : 1.18 Mins.
1998 Lincoln Navigator Flowmaster Super 40 Sound Clip with Performance Modifications. Improvements most within the last 2-3 years: Directed Elec. VIPER 5900 2-way Security, Remote start, SST range;1 mile 0.00 Alpine Detachable head CD stereo main unit Alpine 650 Watt RMS Amplifier, 12" Alpine Type R dual voice coil sub, ported enclosure Capacitor with digital voltage readout to maintain voltage to amplifier 4 Infinity high performance door speakers All stereo equipment 50.00 (2007) (Note: If you are looking at this to purchase and want the stereo equipment, add 0.00 to the 00.00 price, otherwise the factory unit will be re-installed - we will leave the Infiniti door speakers) K&N GEN II FIPK 57-2541 INTAKE- 0.00- Estimated HP Gain: +13.12 HP @ 4562 RPM JET PERFORMANCE MASS AIRFLOW SENSOR Part #: 69112 - 1.00 - Approx +15HP Gain BBK 75MM THROTTLE BODY - 0.00 - approx +18 HP Gain 180 DEGREE THERMOSTAT - .00 - approx +13 HP (MFG states) JBA JBA-1679S-4 Stainless Steel HEADERS - 0.00 - approx +40HP gain (2008) 3" FLOWMASTER muffler, custom 3" Pipe, 18" Summit Racing SS Tip; - 0.00 -approx +16HP Gain (2008) SUPERCHIPS PERFORMANCE TUNER #1715 - 5.00 - approx +20HP Gain (2008) NEW NGK HIGH END SPARK PLUGS - .00 (2008) NEW ACCEL COILS - 0.00 (2008) NEW ACCEL FUEL INJECTORS - 0.00 (2008) ENERGY SUSPENSION FRONT & REAR SWAYBAR BUSHING KITS - .00 (2008) Powerslot Cryo-treated Slotted Rotors FRONT - 0.00 (2008) Akebonos ProACT™ Ceramic ...
Keywords: Lincoln, Navigator, 5.4L, Performance, headers, for, sale, flowmaster, super, 40, sound, clip, alpine, type, sub, amplifier, viper, K&N
Nissan has fit Sentra models with three main brake systems, each serviced in a different manner. However, rear drum brake assemblies, although relatively easy, contain a few more components that you can easily misplace. Still, using the right approach and the proper tools will help you replace the brake pads or shoes quicker and correctly.
Front Brake Pads
Before replacing the front brake pads, remove at least half the brake fluid from the brake master cylinder using a clean turkey baster. This will avoid spilling fluid when retracting the caliper piston.
After removing the wheel assembly, unscrew the bottom guide pin from the brake caliper and swing the caliper up. Then you can remove the brake pads, retainers and shims.
Before installing the new pads, retract the caliper piston. Place one of the old brake pads against the piston and push the piston into its bore using a large C-clamp. Then install the new pads, shims and retainers.
Before driving your vehicle, depress the brake pedal several times to properly seat the new pads, check the brake fluid level and refill if necessary.
Rear Disc Brake Pads
If you are replacing the rear brake pads, you will need to remove the parking brake cable bolt from the brake caliper first. If the caliper comes equipped with one single bottom mounting bolt, replace the pads as you do with the front pads. Otherwise, remove the bottom and top mounting bolts, lift the caliper off its bracket and secure it to the suspension using a piece of wire to prevent damage to the brake hose connected to it. Then take out the pad springs, pads and shims.
To retract the caliper piston into its bore, use a pair of needlenose pliers or a disc brake piston tool. Turn the piston clockwise until the piston seats completely, being careful not to damage the piston boot. Never use a C-clamp on these rear brake calipers or you will damage the system.
Before installing the new pads, coat the pads contact areas on the mounting support with silicone-based grease and reassemble the rest of the components.
After installing the wheel/tire assembly, lower your vehicle, depress the brake pedal several times to properly seat the new pads, check the brake fluid level and refill if necessary.
Rear Brake Shoes
Some Nissan Sentra models come equipped with rear brake shoes assembled under a brake drum. On brake shoes, it is a good idea to remove both wheel drums and then work on one assembly at a time, using the other as a visual reference to properly install the different components. Pay special attention to the springs, which come in different sizes. You need to reinstall them not only in their correct place but in their exact same position for the brake shoes to operate properly.
Depending on your particular model, you can remove the drum by screwing two 8 mm by 1.25 mm bolts on the drum-threaded holes; by removing the center grease cap, cotter pin and wheel bearing nut (1982 to 1990 Sentra models); or by removing the wheel-bearing nut (1991 to 1992 Sentra models).
Whichever model you own, if the drum seems stuck onto the brake assembly, retract the brake shoes through the adjusting hole in the back of the backing plate. To do this, remove the rubber plug from the hole. Then use a standard screwdriver to push the lever off the star wheel on the adjusting screw and use a brake adjusting tool to turn the star wheel until the shoes back off the drum wall.
To remove the brake shoes, unhook the top return spring, bottom adjuster and return springs. Then remove the two hold-down springs and retainer pins on each shoe. Carefully lift the shoes off the backing plate and remove the adjuster lever. Once you remove the shoes, take the parking brake cable and adjusting lever off the rear shoe and install it on the new shoe.
Before installing the new shoes, clean the backing plate with brake parts cleaner and coat the brake shoes contact points on the backing plate with brake grease. Then install the new shoes using the opposite wheel assembly as a guide.
The first objective is to maintain the clearance between the moving and stationary parts of a brake in accordance with the manufacturers instructions. Disassemble and inspect the brake periodically and examine the parts for wear, cracks, warpage, corrosion, elongated holes, etc. If any of these or other faults are indicated, repair, recondition, or replace the affected parts in accordance with the manufacturers recommendations. Surface cracks on the friction surfaces of the brake drums occur frequently due to high surface temperatures. These surface cracks may be disregarded as seriously affecting the airworthiness until they become cracks of approximately 1 inch in length.
Hydraulic aircraft brakes
For proper hydraulic aircraft brake maintenance, periodically inspect the entire hydraulic system from the reservoir to the brakes. Maintain the fluid at the recommended level with proper brake fluid. When air is present in the brake system, bleed in accordance with the manufacturers instructions. Replace flexible hydraulic hose which has deteriorated due to long periods of service and replace hydraulic piston seals when there is evidence of leakage. Service anti-skid units according to the manufacturers instructions.
Mechanical aircraft brake maintenance.
Keep the working parts of mechanically operated brakes free from dirt and foreign matter so the brakes can work freely at all times. Slack in the linkage system must be kept to a minimum.
Hazards of aircraft brake maintenance and repair
Asbestos containing materials are a component of the brake systems in some light aircraft. It has been suggested there might be a danger of asbestos resulting from the installation and maintenance of these components, particularly if the brake changing process takes place in a closed, unventilated aircraft hanger. However, tests have shown that operations performed according to the manufacturers recommended procedure, normal brake changing work practices on aircraft with asbestos containing brakepads, do not produce a harmful level of asbestos exposure for aircraft mechanics.
There arent many things as dangerous as a car with inefficient brakes, you know this.
Regularly changing brakepads is really important.
Your safety while driving depends on several factors but regarding brakes it all depends on equipment: saving few bucks on brakepads isnt worth!
Theres no need to go to the mechanic to replace your brakepads, you can easily do it yourself.
If its the first time you do it allow it some hours, its not difficult but it will require some time if youre not experienced.
Attention: after driving the car brakepads and brake discs are hot.
Avoid any possible risk working in a safe area.
Make sure your car will not move at all, set the handbrake and park in a plain area.
Loosen the lug nuts before jacking the car up.
Jack the car up so you can remove the wheel as if replacing the wheel. (Use two jack stands for your safety)
Remove the caliper bolts and make it slide away from the disc: brakepads are the black parts that were near the disc surface.
Remove them from the caliper: there are several kinds of calipers so you have to see how it works in your car but you should easily do it: its just a matter of bolts or clips.
Take the occasion to check brake rotors condition, rotors must be the more smooth possible and must not have any asperities. If its damaged youll have to get a new one. Discs can also be reconditioned but its not recommended.
Now, with the new thicker pads you need to push the caliper piston back to its original position in order to create enough space for the new pads, you might need an adjustable spanner or a C-Clamp.
Apply brakepad grease on the part that wont be in contact with the rotor and put them inside the caliper.
Reassemble everything as it was and proceed with the other side and the rear axle if your car has four disc brakes.
Youre done, go out for a test and drive slow. Pay attention, the brake pedal might be softer and braking spaces longer. In few days the new pads should reach their final position and any noise should disappear.
A brake caliper on a 2005 Ford Escape houses the brake pads. Mounted inside a caliper bracket, over the top of the brake rotor, the caliper contracts on the rotor when you apply the brakes. This action clamps the brake pads onto the rotor in order to stop the small SUV. Ford Motor Company recommends inspecting the brake pads at every other oil-change interval and replacing them when they fall below 3 mm in thickness. Anyone with a solid grasp on automotive repair can remove a 2005 Ford Escape brake caliper.
Instructions
1
Position the wheel chocks against one of the Escapes rear wheels. Turn each individual front lug nut counterclockwise with the lug wrench to loosen them.
2
Jack the front end of the Escape off the ground. Set the two jack stands under the front frame and lower the Escape onto the jack stands.
3
Take off the Escapes front lug nuts and wheels by hand to expose the brake calipers. Put the drain pan below the caliper and use the brake cleaner to wash away the accumulated brake dust.
4
Remove the Escapes caliper bolts with the socket set. Grab the caliper body with both hands and remove it from the caliper bracket.
How to Inspect and Replace Car Brake Rotors : How to Jack Your Car & Break Loose the Lug Nuts Video Clips. Duration : 3.05 Mins.
Learn how to jack up your car and break loose the lug nuts to take off the wheel - free video. Expert: Nathan McCoullough Bio: Nathan McCullough graduated from Nashville Auto-Diesel College with a Grade Point Average of 3.5 and received their craftsmanship award and honor seal. Filmmaker: Robert Rogers
Tags: car, brake, rotors, auto-repair, automotive, inspection, replace, free, video

 Here is picture of original disc