Showing posts with label repair. Show all posts

How to Repair Subaru Brakes

How to Repair Subaru Brakes

Repairing Subaru brakes is a task that has many avenues of approach. There are several components to a braking system that may need to be repaired. The brake pads and braking rotors are the fundamental components of the braking system. The calipers and the brake lines are also key components that may be in need of repair or replacement. It is essential that the Subaru owner inspects all of the components of the braking system when making repairs or replacements to any other component, to ensure that any brake work will solve the problem completely.

Instructions

Replace the Brake Pads and Rotor

    1

    Park the Subaru in a location that allows you to work on both sides of the vehicle. Loosen the lug nuts on the wheels with the tire iron. Place the lifting jack beneath a frame of the vehicle. Lift the Subaru and place jack stands under the frame. Leave ample clearance between the tires and the road surface.

    2

    Remove the lug nuts and the wheels from the Subaru. Turn the steering wheel to the side of the vehicle opposite the brake you are repairing. Remove the caliper bolts on the side of the caliper closest to the vehicles frame, with a 13 millimeter wrench. Pull the caliper from the rotor.

    3

    Slide the brake pads from the two sides of the caliper. Open the bleed valve on the caliper with the 10 millimeter wrench. Place the drip pan beneath the brake. Place the C-clamp over the caliper pistons and the side of the caliper. Screw the C-clamp so that the pistons are forced against the side of the caliper. The excess brake fluid will drip from the bleed valve into the drip pan below.

    4

    Close the bleed valve with the 10 millimeter wrench. Slide the new brake pads onto the walls of the caliper.

    5

    Pull the rotor from the wheel bolts. If the rotor is stuck to the wheel bolts, use a hammer and tap the rotor until it is free.

    6

    Remove the new rotor from the packaging. Spray the entire rotor with brake cleaner. Wipe the rotor clean with a towel. Place the new rotor onto the wheel bolts.

    7

    Replace the caliper onto the rotor. Screw in the caliper bolts of the 13 millimeter wrench.

Bleed the Brake Lines

    8

    Loosen the lug nuts on the rear wheels with the tire iron.

    9

    Place the lifting jack beneath the frame at the rear of the Subaru. Lift the vehicle and place jack stands under the frame. Lower the vehicle onto the jack stands.

    10

    Open the hood of the Subaru. Remove the cap on the master cylinder (the master cylinder is located near the windshield on the drivers side of the vehicle). Position the spare tire on the top of the engine. Make sure the air filler nozzle is near the master cylinder. Connect the master cylinder cap from the bleed kit to the master cylinder container. Connect the tubing from the bleed kit cap to the air fill nozzle of the spare tire. This will provide the pressure needed to belled the brake line.

    11

    Remove the lug nuts by hand and pull the wheels from the wheel bolts. Place the tube from the pressure bleeding kit onto the bleed valve of the right rear brake. Place the 10 millimeter wrench onto the bleed valve. Place the drip pan beneath the brake.

    12

    Open the bleed valve with the wrench and watch the flow of brake fluid through the tube. When there are no air bubbles in the fluid stream, close the bleed valve with the wrench.

    13

    Remove the bleed kit tube from the bleed valve and place it on the bleed valve of the left rear brake. Repeat the steps for bleeding before moving to the front right brake, and ending on the front left brake.

    14

    Replace the wheels onto the wheel bolts and screw on the lug nuts. Lift the vehicle to remove the jack stands and then return the vehicle to the ground. Tighten the lug nuts with the tire iron.

    15

    Remove the bleed kit master cylinder cap from the container. Fill the master cylinder with DOT-3 brake fluid and replace the master cylinder cap. Disconnect the bleed kit tube from the spare tire and stow the tire. Close the hood.

    16

    Press the brake pedal slowly to restore the brake fluid to the calipers.

Read More..

Auto repair videos How to Change Brake Pads

Summary:www.know-car.com auto repair videos When changing brake pads on a car, make sure the car is jacked up, remove the bolts on the caliper and remove the brake pads. Replace brake pads in a car with help from an auto mechanic in this free video on car maintenance and repairs.

Read More..

How to Repair Car Window Rubbers

The rubber on a car window can become cracked or chipped over time. Rubber on car windows usually dries out as a result of sun exposure and poor maintenance. Once the rubber dries out, it tends to shrink. This can cause irreversible damage to the rubber. Fortunately, depending on the extent of the damage, it can be repaired using a special sealant.

Instructions

    1

    Wash the rubber with soap and water using a sponge.

    2

    Dry the area with a lint-free towel.

    3

    Apply a bead of urethane sealer to the window rubber and smooth it out over the rubber with an applicator pad. Make sure that the urethane seals any cracks or covers any chipped areas in the rubber.

    4

    Allow the urethane to dry (called "curing") overnight before exposing it to any sunlight (or elements in general).

Read More..

DIY Windshield Glass Scratch Repair

DIY: Windshield Glass Scratch Repair

Common causes for scratches on vehicle windshields can be attributed to airborne rocks and other debris slamming into the glass at high speeds. The repair for scratches and nicks in a windshield is fairly simple, and you only need a few materials. Gather them then try to work outside on a sunny day. This will help speed the drying time for the repair.

Instructions

    1

    Combine water and a mild dish soap in a bucket. Pour in a few drops of denatured alcohol and stir with your hands. Put on your goggles.

    2

    Soak a cloth in the solution, then wipe down the entire windshield.

    3

    Soak another cloth in clean water then wipe down the windshield. Dry the windshield with a dry cloth.

    4

    Remove glass shards from the cracks. Use the corner of the razor blade to carefully dig out the loose pieces.

    5

    Fill the syringe with resin then squirt a few drops out to release air bubbles. Check the amount of resin that comes out as you press it.

    6

    Fill the cracks. Put the syringe tip in the crack, push down on the syringe end to release the resin. Allow it to overfill the entire crack. Let it dry for a few hours in the sun.

    7

    Remove the resin that has hardened above the surface by turning the razor blade on its side and scraping evenly across the surface.

Read More..

How to Repair Star Break in Windshield

A star break is a kind of break in a windshield that is usually made from a regular sized rock hitting the car. It looks like a small "x," or sometimes it can appear as just a little sliver. It doesnt really obscure your view, but over time, star breaks can grow into large cracks that will make the entire windshield to have to be replaced.

Instructions

    1

    Gather your tools. Grab your drill with a carbide tip. You also need a torch to heat up the break to prep the glass. Get cellophane patches and a couple of anaerobic resins like Stone Chip of Chipfix, Inc. products that works with ultraviolet light. You also need a UV light. Get out a probe to use as a chisel on the break. Pull out a regular razor blade to scrape the glass and most importantly for windshield repair will be the bridge. The bridge, also called Injectors, is the piece of equipment that sticks to the glass. It uses a piston that injects the resin in and siphons air out

    2

    Understand the process of repairing a windshield of make of. Windshields have two layers of laminated glass. When a rock or something hits the windshield, air gets in between the two layers, which will make the break contract until you have a long crack across the windshield. When the resin is injected inside the break, the bridge fills up the cracks while at the same time it pulls out any air that has been caught between the glass layers.

    3

    Make any break into a bullseye break. A bullseye break is the only kind of break that isnt going to keep on cracking because instead of little stars or lines shooting out that air gets in and expands, bullseye breaks have a little circle that surrounds any sharp fingers. Tap the probe into the center of the star break until the glass forms the circle. You dont have to tap too hard.

    4

    Drill into the center of the break. What you want to do is make sure there isnt any loose glass floating around in the broken area. As you drill the center of the break, a circle will pop around the break, making it become the classic bullseye, which is what you want.

    5

    Inject the resin into the Bridge or Injector. Place the Injectors tip right in the center of the break. Screw the feet down to secure it to the glass. Pull the vacuum. Some bridges have hand pumps, or may be electric or spring loaded. The vacuum draws the air out of the glass. Do that a few times to get all the air out.

    6

    Leave the Injector there and either let this cure in the sun or place an ultraviolet lamp next to it.

Read More..

How to Repair a Subaru Outback Window

How to Repair a Subaru Outback Window

Basic car repairs may call for you to bring your car into the shop, but smaller damages like a cracked window on your Subaru Outback are nothing to fret over. Perform this repair easily at home with the right materials and some time. Fixing the damage before it gets worse is the key to preventing future occurrences.

Instructions

    1

    Wash off the window with soap and water. Dry off with a soft cloth.

    2

    Scrape any loose shards of glass out of the cracks with the corner of the razor blade. Make sure you have the goggles on for safety purposes.

    3

    Set the suction cup stabilizer in place. Hold it over the crack, push it down onto the glass and see the suction between the two begin to form.

    4

    Place the resin tube into the injector, and then push the injector into the stabilizer unit.

    5

    Pull the injector out. The resin will begin to fill the cracks due to the intense suction between the stabilizer and the glass.

    6

    Remove the stabilizer once the resin tube is empty, and place the adhesive film over the fresh repair. Let dry.

Read More..

How to Repair Motorcycle Brakes How to Reassemble a Motorcycle Caliper

Reassemble a motorcycles brake caliper--whether one, two or four pistons--during motorcycle brake maintenance; learn how with the tips from this free video.Expert: Seth Williams Bio: Seth has been working on motorcycles and ATVs since he was 13. He trained at Motorcycle Mechanics Institute of AZ. and currently works at DK Service in Cottonwood, AZ. Filmmaker: Chuck Tyler

Read More..

Preventive Maintenance Tips to Check and Troubleshoot the Repair of Document Scanner Problems

Maintenance and care of equipment is essential to prevent costly repairs and to save unnecessary service calls. In most cases, malfunctions are resolved by operator checks and corrective action. Your wallet will thank you, when the operator has properly checked to determine why devices are not functioning and avoids calling for service to repair or replace a working device.

Before operating the unit, read the manual that was included in the box or download it from the manufacturer website. Otherwise, you may risk damaging the device or voiding the warranty.

PMCS - Preventive Maintenance Checks and Services

Cleaning is the most important step to keep your device working properly. Clean dirty brake rollers, feed rollers, pads, glass, shading plates with a manufacturer cleaning kit or isopropyl alcohol, a lint free cloth, and Q-tips. Also make sure that the paper path is clean and free of debris.

Depending on the condition of documents and environment, the equipment may require a periodic disassembly to fully clean debris, paper clips, staples, dust, etc. that may have worked its way into the insides of the mechanism. The debris can cause a motor to stop running and rollers and belts to jam. Use a shop-vac to vacuum whatever dirt or foreign objects that have worked their way inside the main and side covers. Generally, it is not recommended to blow the scanner out using a compressed can of air. The reason is that the compressed air leaves film on the glass, does not remove the dirt (just blows it around), may break seals and cold air could damage a hot sensor.

CDD (Charge-coupled device) Cameras and CIS (Contact Image Sensor Assembly) Reader

Upon disassembly, the cameras units on devices with CCD cameras should be cleaned. Care should be taken not to damage the cameras as they are usually quite expensive. Canon products are equipped with CIS reader assemblies with a LED light source and the reader assemblies should not be removed or disassembled to avoid damage.

Consumable Replacement

Separator pads and pick rollers should be replaced when worn or according to manufacturer schedule. Shading plates and glass should be inspected and replaced as required. Fluorescent lamps usually require replacement between 500 to 1000 hours of use according to manufacturer guide recommendations. Canon uses a LED light source that usually does not require periodic replacement.

The Scanner System

Systems include not only the scanning devices, but also the computer and operating system as well as the software. There is a tendency to think that problems are mechanical. This is not always the case. In order to resolve the troubles, users may require technical competency. A+ skills and practices should be employed to troubleshoot the system before a service call. The technician is hired to fix the hardware. It is not his job to diagnose computer systems. This is your job or the job your IT department.

Hardware Feed Issues and Poor Scan Quality

Feed issues and poor scan quality are usually corrected through cleaning and replacing worn consumables. Brake and pick rollers should be checked to ensue that they are properly installed. The paper path should also be inspected and any foreign objects removed.

Scanning Software

Common are issues with drivers not found or installed. Re-install the software or make sure that the driver is recognized. Outdated firmware may also cause the equipment to not operate properly. Install the latest firmware. But note installation of incorrect firmware in some cases could permanently damage the main control board. Also, recheck the scan settings to assure that they are set properly.

PC Computer and Operating System

You must assign each SCSI device a separate SCSI ID to avoid an ID conflict. USB and fire wire devices need proper privileges and security rights when connected to a network. The best method to check for problems with the operating system is to swap the computer with another that you know to be working properly.

Troubleshooting and Repair

You can find minor parts that you can fix without too much technical knowledge. For instance check for broken parts and the tension of springs and flat springs. A parts manual can help you identify a problem. Some companies provide diagnostic software. The Canon quma tool provides diagnostic checks of motors, sensors, solenoids and other essential parts.

If you do not have the technical ability, you can buy a service agreement for your scanner. The warranty covers the maintenance and repairs rather than risking a breakdown and costly time and material repairs. Another option is depot repair where you send the equipment to the repair facility which is less costly than on-site services. Some manufacturers only provide a 90 day warranty and the purchase of an extended warranty is recommended.

Read More..

How to Repair Cracked Windshield

How to Repair Cracked Windshield

Small stones, sticks, plastic and other road debris can cause damage to the windshield of a car. Chips and cracks can be sealed and repaired without having to replace the entire windshield, saving the vehicle owner hundreds of dollars. Windshield repair at home requires approximately one hour.

Instructions

    1

    Clean the windshield with a rag and glass cleaner. Make sure loose glass chips and dirt particles are removed from the crack.

    2

    Place the suction cup that comes with a repair kit on the end of the resin-filled syringe. Secure the suction cup over the crack in the windshield.

    3

    Depress the syringes plunger. Pull it slowly back up to remove air from the crack. Slowly depress the plunger again, pushing the resin into the crack. Depress the plunger at least 10 more times. Keep the syringe attached to the windshield. Let the resin cure for 30 minutes after each depression of the syringes plunger.

    4

    Remove the suction cup and syringe from the windshield. Scrape excess resin from around the crack with a razor blade. Do not scrape the resin in the crack itself.

    5

    Clean the area with glass cleaner, and wipe it down with a clean, cloth rag.

Read More..

How to Repair a Power Window on a Windstar 2002

The primary components of a power window are the glass, the regulator that holds the glass, the control switches and the wiring connecting the switch to the regulator. Cracked or broken window glass needs to be replaced, but the regulator, the switches and the wiring can also cause problems. What you need to do for repairs depends on where the malfunction is. This can be tricky on a Ford Windstar 2002 van, as the window glass and regulator are installed with rivets instead of bolts.

Instructions

    1

    Disconnect the vans negative battery cable with the window down.

    2

    Pry out the trim cover for the inside handle with a small flat screwdriver, then pull out the switch control plate, disconnecting its electrical connector. Replace the control plate and skip to Step 8 if thats all you need.

    3

    Pull out the side mirror cover, then remove all the screws on the door panel along the edges and behind the switch plate. Pull the panel off its clips and off the door, then peel away the watershield.

    4

    Disconnect the electrical connector for the window regulator. If the wiring is damaged and this is the only issue, install a new wiring harness and skip to Step 7.

    5

    Drill out the rivets holding the window glass to the regulator and lift the glass out of the door. Drill out the regulators rivets, then pull the arm bracket and regulator out through the service hole.

    6

    Install the new regulator within the door and fasten it with a rivet gun. Slide and lower the door glass into the door and regulator and apply rivets to it, then connect the electrical connector.

    7

    Paste the watershield back onto the door and reinstall the door panel with its clips and screws.

    8

    Plug in the electrical connector and install the switch plate followed by all other small trim panels you removed.

    9

    Reconnect the battery cable.

Read More..

How to Repair an Automobile Windshield

How to Repair an Automobile Windshield

A damaged windshield should always be promptly repaired, if not replaced. The windshield is actually a major structural component of your vehicles cabin, and driving with a damaged or unstable windshield can be dangerous, especially if you encounter strong winds or are involved in a crash. Windshield work often requires professional help, but for the experienced practitioner, it is possible to repair your own.

Instructions

    1

    Acquire a thorough understanding of how to remove and install windshields by reading a good selection of auto repair manuals. You can obtain such manuals and reference materials from your car dealership or you can purchase windshield repair videos, either from your local bookstore or online. You should feel absolutely comfortable in repairing your cars windshield.

    2

    Wax down the windshield moldings until it is completely soaked, allowing you to easily remove the trim without damaging the windshield itself. If possible, repeat this process everyday for at least three days, especially if the trim is old and rusted. When the molding is completely soft, removing the trimmings should be almost automatic.

    3

    Slip the hooked trim removal tool underneath the trim so that the hook can connect with one of the clips. Release the clip by pulling the tool toward you or the middle of the window. Normally the trim will be connected with a snap on clip or a bolt on clip. Repeat this process for each clip along the windshield.

    4

    Cut the butyl window seal away from the windshield with a utility knife. Do this around the whole circumference of the windshield. This must be done with caution in order not to further damage the glass.

    5

    Use the cold knife to penetrate the butyl material. To do this, position the 90 degree blade of the cold knife into the channel between the windshield and metal frame. The blade should be in alignment with the frame of the windshield. Pulling the T-handle of the cold knife should allow it to penetrate the butyl material. The whole process of cutting through the butyl material should take no longer than six minutes.

    6

    Push out the windshield gently from inside the car. As you do this, the window will stay in place due to the factory rests attached to the cowl. Seek an assistant or two to hold the windshield up until you get out of the car. Once the windshield is removed, put it aside for repair and installation.

Read More..

Aircraft Brake Maintenance and Repair

The first objective is to maintain the clearance between the moving and stationary parts of a brake in accordance with the manufacturers instructions. Disassemble and inspect the brake periodically and examine the parts for wear, cracks, warpage, corrosion, elongated holes, etc. If any of these or other faults are indicated, repair, recondition, or replace the affected parts in accordance with the manufacturers recommendations. Surface cracks on the friction surfaces of the brake drums occur frequently due to high surface temperatures. These surface cracks may be disregarded as seriously affecting the airworthiness until they become cracks of approximately 1 inch in length.

Hydraulic aircraft brakes

For proper hydraulic aircraft brake maintenance, periodically inspect the entire hydraulic system from the reservoir to the brakes. Maintain the fluid at the recommended level with proper brake fluid. When air is present in the brake system, bleed in accordance with the manufacturers instructions. Replace flexible hydraulic hose which has deteriorated due to long periods of service and replace hydraulic piston seals when there is evidence of leakage. Service anti-skid units according to the manufacturers instructions.

Mechanical aircraft brake maintenance.

Keep the working parts of mechanically operated brakes free from dirt and foreign matter so the brakes can work freely at all times. Slack in the linkage system must be kept to a minimum.

Hazards of aircraft brake maintenance and repair

Asbestos containing materials are a component of the brake systems in some light aircraft. It has been suggested there might be a danger of asbestos resulting from the installation and maintenance of these components, particularly if the brake changing process takes place in a closed, unventilated aircraft hanger. However, tests have shown that operations performed according to the manufacturers recommended procedure, normal brake changing work practices on aircraft with asbestos containing brake pads, do not produce a harmful level of asbestos exposure for aircraft mechanics.

Read More..

How To Repair A Broken Turbo Air Intake Hose

If you have a car powered by EP6DT type of engine, the time will certainly come when your air intake hose breaks apart around the turbo flange. Some if not all authorised@auta-rised service centers may charge you up to around RM500 to replace it if the warranty was voided/expired.

Actually you dont have to spend that much because it is quite easy to repair by yourself (it will take you in less than 30 minutes) if you already have the following items...

(Rapid Araldite (epoxy rasin), Black RTV Silocone, Super Glue, PTFE Tape, Cloth Tape/Strip (1/2" x 6") and flat/matte black paint spray-optional).

The following simple steps show in details how I repaired the broken hose on a Citroen C4 Picasso.

1. Clean the broken portions of the hose...
and then stick them up together back in place using super glue.

2. Apply a thin layer of epoxy resin around the outside surface of the damaged part of the hose.

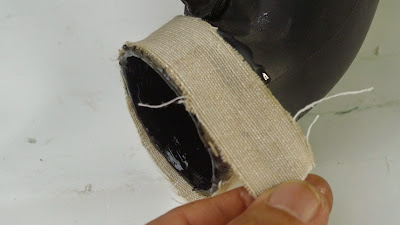
3. Wrap around with a layer of cloth strip before the resin is set. Do NOT use fiberglass cloth.

4. Apply another layer of epoxy resin on the cloth which already wrapped around the hose end.

5. Apply a thin layer of black RTV silicone on the inside surface of the hose to improve air tightness.

6. Wrap around with three layers of PTFE tape...

7. Spray two or three coats of flat/matte black paint on the PTFE tape which is already wrapped around the hose in (6).


QED!

Read More..

How to Repair a Window Channel on a Car

The window channel on a car is where the water runs down and away from the glass. Window channels also help keep water out of the inside of the car. However, the seams in window channels may eventually separate due to the sheet metal flexing. When this happens, reseal the seams in the window channel.

Instructions

    1

    Clean the window channel with soap and water.

    2

    Dry the channel with a lint-free towel.

    3

    Apply a bead of seam sealer to the seams on the window channel. Make sure that you get good coverage on any seams that are showing visible cracks.

    4

    Smooth the sealer across the seams with your fingers.

    5

    Allow the seam sealer to dry for at least 24 hours before exposing it to water.

Read More..